Как использовать <merge> для оптимизации лейаутов?

Представим себе простую ситуацию — нам нужно создать вью, отражающий название компании и её рейтинг, и его мы будем пятьдесят раз использовать в приложении.
<LinearLayout xmlns:android="http://schemas.android.com/apk/res/android"
   android:layout_width="match_parent"
   android:layout_height="match_parent"
   android:orientation="horizontal">

   <ImageView
       android:id="@+id/rating"
       android:layout_width="wrap_content"
       android:layout_height="wrap_content"
       android:layout_marginRight="16dp" />

   <TextView
       android:id="@+id/name"
       android:layout_width="wrap_content"
       android:layout_height="wrap_content" />
</LinearLayout>
Теперь давайте создадим класс, его описывающий. Допустим, у нас будут два метода: один меняет картинку рейтинга в зависимости от значения, а другой задаёт имя:
public class RatingView extends LinearLayout {

   private TextView nameView;
   private ImageView ratingView;

   public RatingView(Context context, @Nullable AttributeSet attrs) {
       super(context, attrs);
       LayoutInflater.from(context).inflate(R.layout.name_view, this);
       ratingView = findViewById(R.id.rating);
       nameView = findViewById(R.id.name);
   }

   public void setRating(int rating) {
       switch (rating) {
           case 1:
               ratingView.setImageResource(R.drawable.one_star);
               break;
           case 2:
               ratingView.setImageResource(R.drawable.two_star);
               break;
           case 3:
               ratingView.setImageResource(R.drawable.three_star);
               break;
       }
   }


   public void setName(String value) {
       nameView.setText(value);
   }

}
Отлично. Теперь давайте запихнём наш вью в лейаут активити:
<android.support.constraint.ConstraintLayout xmlns:android="http://schemas.android.com/apk/res/android"
   xmlns:app="http://schemas.android.com/apk/res-auto"
   xmlns:tools="http://schemas.android.com/tools"
   android:layout_width="match_parent"
   android:layout_height="match_parent"
   tools:context=".MainActivity">

   <com.otus.merge.RatingView
       android:layout_width="wrap_content"
       android:layout_height="wrap_content"
       app:layout_constraintBottom_toBottomOf="parent"
       app:layout_constraintLeft_toLeftOf="parent"
       app:layout_constraintRight_toRightOf="parent"
       app:layout_constraintTop_toTopOf="parent" />

</android.support.constraint.ConstraintLayout>
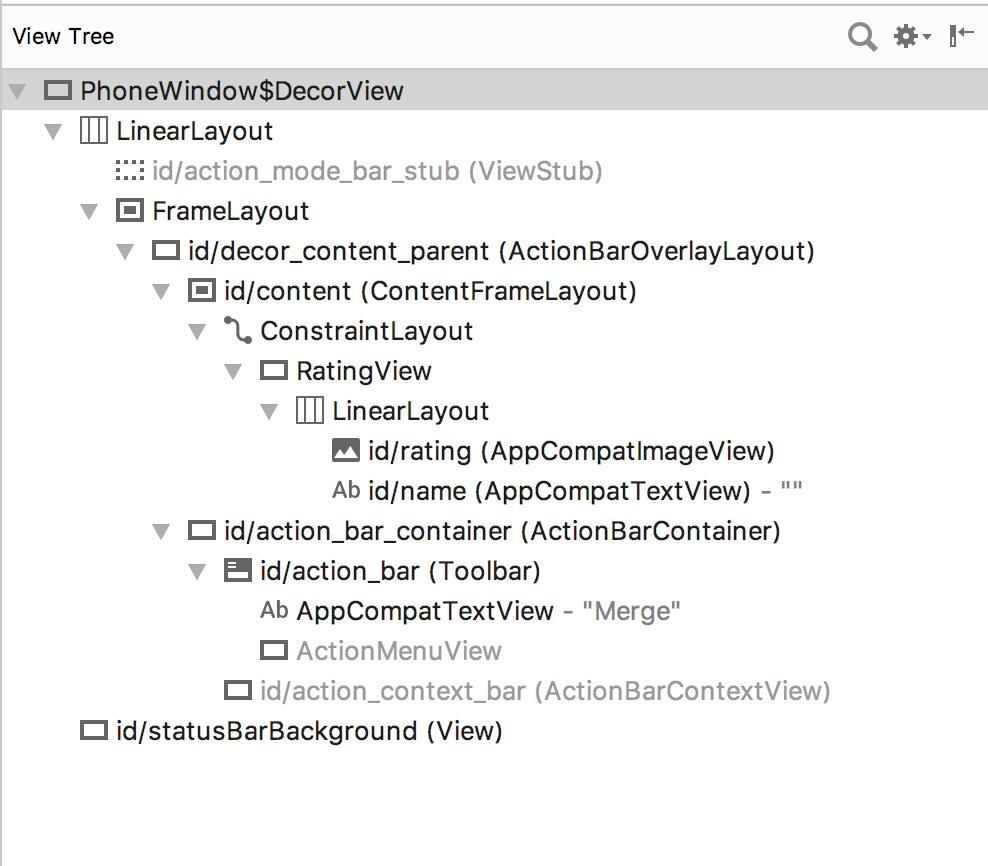
Запустим приложение и заглянем в Tools > Android > Layout Inspector — посмотрим, что же у нас там такое:

Вот как выглядит наше дерево вью:

Видим, что
<merge xmlns:android="http://schemas.android.com/apk/res/android"
   xmlns:tools="http://schemas.android.com/tools"
   android:layout_width="match_parent"
   android:layout_height="match_parent"
   tools:parentTag="android.widget.LinearLayout"
   android:orientation="horizontal">

   <ImageView
       android:id="@+id/rating"
       android:layout_width="wrap_content"
       android:layout_height="wrap_content"
       android:layout_marginRight="16dp" />

   <TextView
       android:id="@+id/name"
       android:layout_width="wrap_content"
       android:layout_height="wrap_content" />
</merge>
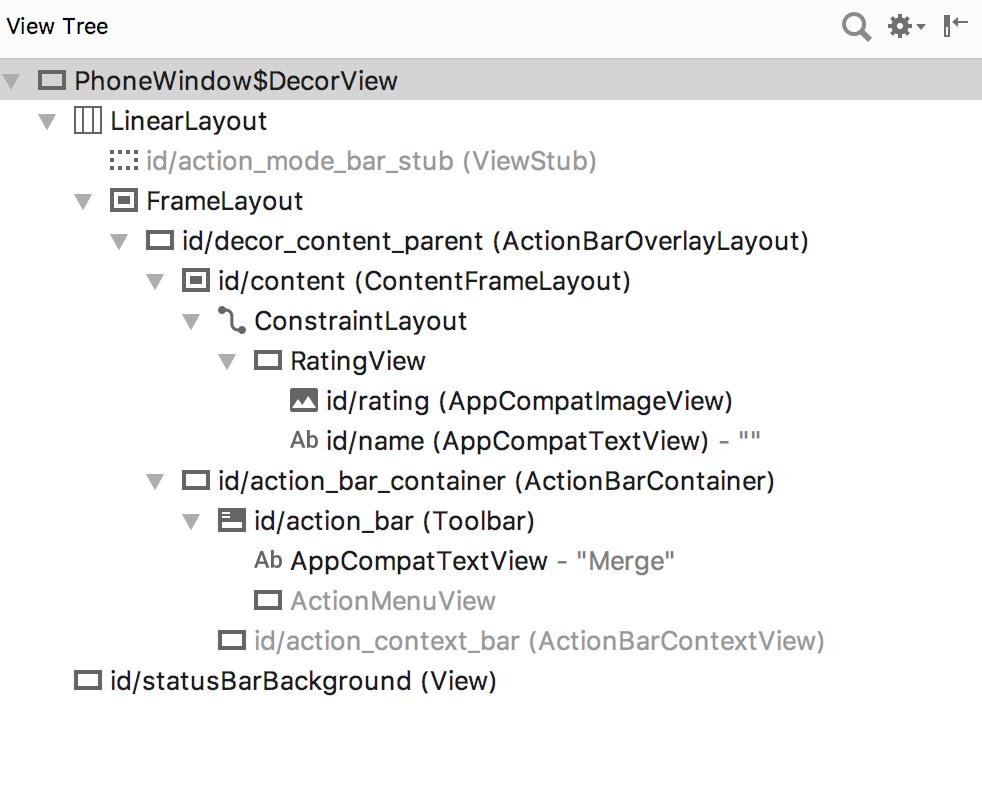
Запустили приложение. Идём в Tools > Android > Layout Inspector.
И, ура!

Мы убрали лишний
Делаем выводы
Итак, для чего же был создан <merge>? Для оптимизации лейаутов путём уменьшения количества уровней в дереве вью. Когда
Несколько моментов, которые нужно учитывать:
— <merge> всегда должен быть корневым тегом;
— в <merge> нужно обязательно указывать
Задать дополнительные вопросы по использованию <merge> всегда можно в комментариях.

